A few years ago the Nördlingen Modeling Club was hit by a severe case of Foam Fever. The culprit was Udo Bloch and his infectious foamies. Completely made of light beadboard foam (brand name "Styropor" here in Germany), such planes can be built on one weekend. They're low-weight (thus excellent performers) yet provide tons of fun. The planes usually are "standoff scale" - it's ok if they look good from a few meters away and in flight, no need for much detailing.
Today, many foam planes can be bought in kit form.
Nevertheless, those who still know how to handle a foam cutter
might enjoy our simple plan of the grandfather of all foamies -
the Hercules C130!
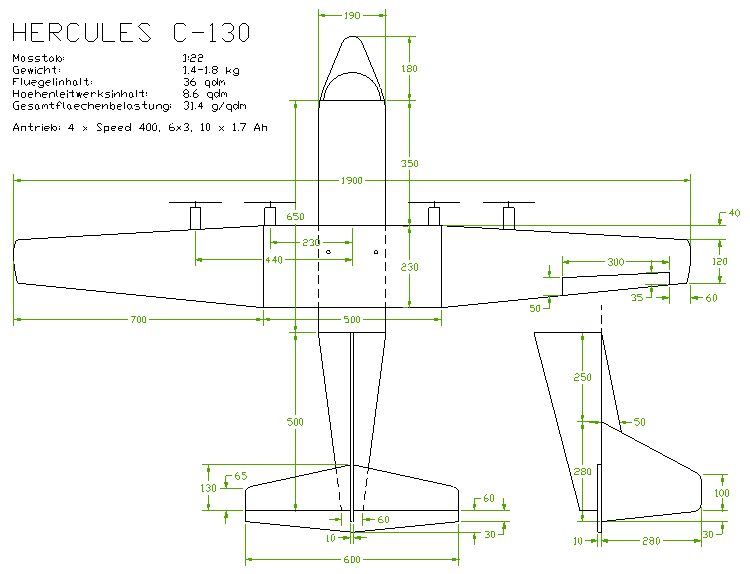 |
Layout drawing of the all-foam C130. |
| DOWNLOAD | C130.EXE (51K) - a self-extracting archive - contains DXF drawings of general dimensions and the foam cutting templates. |
To unpack, copy C130.EXE to an empty directory and
run/execute it. For viewing and printing you need a CAD or other
drawing program (for example, CorelDRAW!) with DXF import
capability. C130.dxf has the outline drawing, C130-s1.dxf the
fuse tube cutting templates and C130-s2.dxf the wing cutting
templates.
You need two large rings and one small disk. Cut the fuse tip
over the outside of the rings only (producing a solid cylinder -
make the cockpit shape with a kitchen knife and a sander) and the
middle fuse tube first over the inside and then over the outside
of the template rings (producing a hollow tube). The rear part of
the fuse is a hollow tapered tube - use one of the rings and the
disk template.
Cut each of the three wing pieces (middle, left and right)
from the bottom near the leading edge up around the leading edge
and back to the trailing edge. After glueing the wing parts
together, cut off the trailing edge to the chords indicated in
the outline drawing (inboard template is 250mm - cut to 230mm;
outboard template is 130mm - cut to 120mm). This results in a
blunt trailing edge which is much less prone to damage.
Cut a spanwise 3 x 3 mm groove into the upper and lower wing
surface at about 30% chord and glue in 3 x 3 mm pine spars. Cut
apart the horizontal and vertical stabs at about 30% chord and
glue in a 10 x 2 mm pine spar.
Use the leftovers from cutting the fuse tube for filler
blocks supporting the wing. Both the wing's lower surface and the
horizontal stab should be parallel to the fuse upper contour (0
degrees incidence angle).
4 Graupner Speed 400 (7.2V) motors and Graupner 6 x 3 props.
Make glass or cardboard tubes with an inner diameter equal to the
outer diameter of the motors. Glue the motor rear ends into the
tubes (make sure to leave the cooling vents open) and the tubes
into the wing. A few glass reinforcements are in order. Use a
good electronic speed controller (rated for at least 40 Amps),
preferably with BEC. You will most likely fly with reduced power
most of the time, so you might find you need cooling vents for
the speed controller.
You can simply paint the thing with wall color or acrylic
water soluable color (make a test first to see if it doesn't mess
up the foam). For a better and more durable finish, cover with
paper, fill, sand and spray paint. Get yourself a 3-side view of
the plane and apply some detail like panel lines and markings
(with a thick felt tip marker).
Keep the plane light. You won't need rudder, just three micro
servos (max. 20 grams) for elevator and the ailerons. Use epoxy
for all foam glueing.
Have fun!